
Developers of custom software and educational simulations.
|
Note: This page is no longer being maintained and
is kept for archival purposes only. For current information see our main page. |
|
|
Kurtz-Fernhout Software Developers of custom software and educational simulations. |
| Home ... News ... Products ... Download ... Order ... Support ... Consulting ... Company |
|
StoryHarp Product area Help System Index Introduction Definitions Tutorials Worlds Agent StoryHarp & IF StoryHarp & Java Registering |
Intermediate Tutorial -- Step 7: Debug with the variable list------| Back | Next | Index The variables list You may have noticed that there is an extra list that can appear on the right side of the player window. This is the variables list. You control whether it appears or not using the Development | Show Variables menu item in the player window. The rest of this section assumes you have the variables list showing. Resizing Notice there is a narrow splitter panel between the left and right sides of the player window; you can drag this splitter to adjust the widths of the two sides. You can use this in conjunction with resizing the window to get a nice fit for everything. Make sure you can see a row with six buttons in the variables list; otherwise some can get cut off if the panel is too small. Restart now It is best to restart your session now before proceeding, by choosing Session | Restart in the Player Window. Parts of the variables list The variables list has three areas. At the top is a drop-down combo box containing all the contexts in the world. Don't change it yet. At the bottom is the list of variables, which includes information on each variable’s name, whether it is true or not true, and how it is used (as a context, move, requirement, change, or command). In between these two areas is a row of buttons which control what shows up in the variables list. The first five buttons at the top of the variables list match the buttons you were clicking to use the browser in the rule editor panel. In the variables list these buttons control which variables you can see. If any of these buttons is down, variables used in that way are shown in the list. The plus button at the end controls whether you can see all the variables in the whole world or just those that are true right now. Show requirements and changes Try setting these buttons now: turn off contexts, moves, and commands, turn off the only-true plus button, and turn on requirements and changes. The buttons should look like this: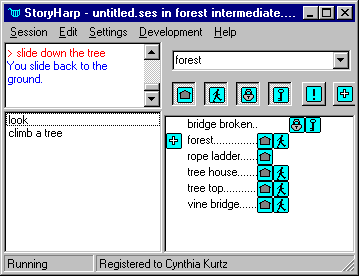 The variables list in the player window
Turn off and on the forest variable
If for some reason you clicked on the plus next to forest by mistake, you
would have set that variable to not true. Let's try that. Make sure the plus button
is up so variables get shown even if they are not true. (Otherwise the “forest” variable would disappear when you clicked on the plus next to it.)
Now click on the plus to the left of "forest". It should disappear. You should
also notice the commands ("look" and "climb a tree") in the command list on
the left side of the player window also disappeared. Now click where the plus
picture was (to the left of “forest”) to bring the plus back. The plus should reappear, along with the commands.
In effect, you just plucked the player out of the forest and into limbo, and
then placed them back into the forest again. You will find such changing of
variable states useful for debugging.
Undo
You can undo turning on and off variables in the variables list by using Edit | Undo in the Player window. Remember that this is a separate undo list from the one
in the world editor window. Try undoing your last toggle now, then redo it to
return to where you were.
Watch the variables list respond to play
The variables list is automatically updated as needed whenever you do a
command in the player window. Let's try it. First, make sure you can see "look" and
"climb a tree" in the commands list in the player window. If no commands were
available, or the wrong ones are available, you were probably mucking about with
the variable list (good for you!). So either undo your changes in the player
window, change things with mouse clicks, or simply just restart the session (the
safest choice). Make sure that the first four buttons in the variables list are
down, and that the command and plus buttons are up.
Now click on "climb a tree" in the command list. Notice that in the variables
list, the plus has shifted from the left of "forest" to the left of "tree top",
and the drop-down list box above the variables list has changed to "tree top".
If you click on "slide down the tree", the plus moves back to next to
"forest", and the drop down list changes to "forest". Try this a few times to get a
feel for it. You can also try moving onto the vine bridge and to the tree house
and back. Watch how the plus moves around.
Move behind the scenes
Note that instead of choosing a command, you can make the same change happen
by turning the variables on and off manually. For example, if you are in the
forest, you can move to the tree house by turning off the plus next to "forest",
and then turning on the plus next to "tree house". Try it. All the commands
should have disappeared from the command list while nothing had a plus next to it.
Activate two contexts at once
Now let's try something more complicated. Leaving the plus on next to tree
house, also turn the plus on next to forest. You should now see three commands in
the command list – "look", "climb a tree" and "go onto the vine bridge". The system is
presenting you choices as if you were in two places at once. You can even click on
"look" and you will get two descriptions:
> look
You are in the forest. There are many majestic trees here. You are in a
swaying tree house.
This is not a bug. It is fundamental to the way the system works. The meaning
of having multiple contexts active at once will become much more clear in the
advanced tutorial. For now, just click next to "tree house" in the variables
list to turn off that context. You will now see commands for "look" and "climb a
tree", and selecting the command "look" will produce (as usual):
> look
You are in the forest. There are many majestic trees here.
Use the drop-down list to move the focus
To simulate a move with the variable list in one easy step, use the drop down
list box above it to select a new location. For example, try selecting "tree
house" from the drop-down list box. Now "tree house" will have a plus next to it,
and "forest" will no longer have a plus next to it. This is a quick way to
move between contexts, even if they are not connected by a move command.
Watch a change play out in the list
Now let's see what happens when we break the vine bridge by jumping up and
down on it. Try it, and see what happens to the variable list. You should see that
immediately afterwards, "vine bridge" becomes not true, and both "forest" and
"bridge broken" become true. If you climb the tree again, you'll see that
"forest" becomes not true, and "tree top" becomes true, but "bridge broken" stays true. In fact, it will stay true until the end of the adventure, unless
another rule explicitly makes it not true (like if you repair the vine bridge
somehow).
Typically, when you play an adventure, over time, more and more variables used
as requirements and changes become true. When you save a session, the system
saves a list of what variables are true. Loading a session file restores the
state of the story world.
Fix the bridge
Let's cheat a bit here. Click on the plus next to "bridge broken" to turn it
off. Now you can cross the bridge again, as well as break it yet another time.
If you want to break it again the easy way, just set that variable to true with
a mouse click.
Changing these variable states is central to debugging and incremental
development. When you want to test a change to a rule, it may be easiest to just set
the state of one or two variables of interest by hand, rather than restoring or
restarting the entire session.
Add commands to the list
As a final thing to try in the variables list, click on the button with the
command icon. Make sure the button with the plus icon is up. You will now see
many more variables, each with the command icon on its line. If you click on the
other buttons to bring them up, leaving only the command icon button down, this
will be a list of all the commands in the system. This is of course the same
list in the left hand side of the browser panel when you browse by command.
There is a variable for each command, but in practice these are rarely used.
The variable named for a command does not have to be true for the command to be
true. Setting it to true will have no effect on the command, unless you
specifically include that variable as a requirements for the command. Often it is
clearest to set up additional variables with names other than the name of the
command to use in requirements or changes; these are sometimes the command phrase
reworded in the past tense to record the command was done.
This concludes the intermediate tutorial. You should now know enough to be
dangerous. We suggest you take a break, perhaps after trying out your new skills
by creating a few rules describing your current surroundings. Then you might
want to proceed to the advanced tutorial to learn some standard ways to create
objects, characters, and conversations.
The variables list in the player window
Turn off and on the forest variable
If for some reason you clicked on the plus next to forest by mistake, you
would have set that variable to not true. Let's try that. Make sure the plus button
is up so variables get shown even if they are not true. (Otherwise the “forest” variable would disappear when you clicked on the plus next to it.)
Now click on the plus to the left of "forest". It should disappear. You should
also notice the commands ("look" and "climb a tree") in the command list on
the left side of the player window also disappeared. Now click where the plus
picture was (to the left of “forest”) to bring the plus back. The plus should reappear, along with the commands.
In effect, you just plucked the player out of the forest and into limbo, and
then placed them back into the forest again. You will find such changing of
variable states useful for debugging.
Undo
You can undo turning on and off variables in the variables list by using Edit | Undo in the Player window. Remember that this is a separate undo list from the one
in the world editor window. Try undoing your last toggle now, then redo it to
return to where you were.
Watch the variables list respond to play
The variables list is automatically updated as needed whenever you do a
command in the player window. Let's try it. First, make sure you can see "look" and
"climb a tree" in the commands list in the player window. If no commands were
available, or the wrong ones are available, you were probably mucking about with
the variable list (good for you!). So either undo your changes in the player
window, change things with mouse clicks, or simply just restart the session (the
safest choice). Make sure that the first four buttons in the variables list are
down, and that the command and plus buttons are up.
Now click on "climb a tree" in the command list. Notice that in the variables
list, the plus has shifted from the left of "forest" to the left of "tree top",
and the drop-down list box above the variables list has changed to "tree top".
If you click on "slide down the tree", the plus moves back to next to
"forest", and the drop down list changes to "forest". Try this a few times to get a
feel for it. You can also try moving onto the vine bridge and to the tree house
and back. Watch how the plus moves around.
Move behind the scenes
Note that instead of choosing a command, you can make the same change happen
by turning the variables on and off manually. For example, if you are in the
forest, you can move to the tree house by turning off the plus next to "forest",
and then turning on the plus next to "tree house". Try it. All the commands
should have disappeared from the command list while nothing had a plus next to it.
Activate two contexts at once
Now let's try something more complicated. Leaving the plus on next to tree
house, also turn the plus on next to forest. You should now see three commands in
the command list – "look", "climb a tree" and "go onto the vine bridge". The system is
presenting you choices as if you were in two places at once. You can even click on
"look" and you will get two descriptions:
> look
You are in the forest. There are many majestic trees here. You are in a
swaying tree house.
This is not a bug. It is fundamental to the way the system works. The meaning
of having multiple contexts active at once will become much more clear in the
advanced tutorial. For now, just click next to "tree house" in the variables
list to turn off that context. You will now see commands for "look" and "climb a
tree", and selecting the command "look" will produce (as usual):
> look
You are in the forest. There are many majestic trees here.
Use the drop-down list to move the focus
To simulate a move with the variable list in one easy step, use the drop down
list box above it to select a new location. For example, try selecting "tree
house" from the drop-down list box. Now "tree house" will have a plus next to it,
and "forest" will no longer have a plus next to it. This is a quick way to
move between contexts, even if they are not connected by a move command.
Watch a change play out in the list
Now let's see what happens when we break the vine bridge by jumping up and
down on it. Try it, and see what happens to the variable list. You should see that
immediately afterwards, "vine bridge" becomes not true, and both "forest" and
"bridge broken" become true. If you climb the tree again, you'll see that
"forest" becomes not true, and "tree top" becomes true, but "bridge broken" stays true. In fact, it will stay true until the end of the adventure, unless
another rule explicitly makes it not true (like if you repair the vine bridge
somehow).
Typically, when you play an adventure, over time, more and more variables used
as requirements and changes become true. When you save a session, the system
saves a list of what variables are true. Loading a session file restores the
state of the story world.
Fix the bridge
Let's cheat a bit here. Click on the plus next to "bridge broken" to turn it
off. Now you can cross the bridge again, as well as break it yet another time.
If you want to break it again the easy way, just set that variable to true with
a mouse click.
Changing these variable states is central to debugging and incremental
development. When you want to test a change to a rule, it may be easiest to just set
the state of one or two variables of interest by hand, rather than restoring or
restarting the entire session.
Add commands to the list
As a final thing to try in the variables list, click on the button with the
command icon. Make sure the button with the plus icon is up. You will now see
many more variables, each with the command icon on its line. If you click on the
other buttons to bring them up, leaving only the command icon button down, this
will be a list of all the commands in the system. This is of course the same
list in the left hand side of the browser panel when you browse by command.
There is a variable for each command, but in practice these are rarely used.
The variable named for a command does not have to be true for the command to be
true. Setting it to true will have no effect on the command, unless you
specifically include that variable as a requirements for the command. Often it is
clearest to set up additional variables with names other than the name of the
command to use in requirements or changes; these are sometimes the command phrase
reworded in the past tense to record the command was done.
This concludes the intermediate tutorial. You should now know enough to be
dangerous. We suggest you take a break, perhaps after trying out your new skills
by creating a few rules describing your current surroundings. Then you might
want to proceed to the advanced tutorial to learn some standard ways to create
objects, characters, and conversations.
|
|
Updated: March 10, 1999. Questions/comments on site to webmaster@kurtz-fernhout.com. Copyright © 1998, 1999 Paul D. Fernhout & Cynthia F. Kurtz. |