PlantStudio
Try it
Buy it
Info
Introduction
Features
Screen shots
Samples
Users say
Reviews
More info
Requirements
License
Help system
History
Support
FAQ
Versions FAQ
Tech support
Feedback
Wish list
Survey
Community
Gallery
Exchange
Mini-tutorials
Links
Link buttons
Mailing list
Newsgroups
|
PlantStudio User Mini-tutorials
These are mini-tutorials for using PlantStudio
(or for using PlantStudio plants in other programs)
submitted by PS users for PS users. If you figure out how
to do something interesting with PlantStudio,
send us your mini-tutorial
and we'll post it here.
How to Use PlantStudio Plants in Poser3/4
Frédéric Malmartel
|
 When you import DXF plants from PlantStudio to Poser3/4, if you use simply
Import with the DXF function of Poser3/4, the plant will be imported with only
one layer. So you'll be able to give it only one color, even if you've saved it
with the function "place each type of plant part in its own layer" in
PlantStudio! You won't be able to make yellow flowers with green leaves!
What a pity! It's a problem with Poser3/4, it's not specific to PlantStudio.
When you import DXF plants from PlantStudio to Poser3/4, if you use simply
Import with the DXF function of Poser3/4, the plant will be imported with only
one layer. So you'll be able to give it only one color, even if you've saved it
with the function "place each type of plant part in its own layer" in
PlantStudio! You won't be able to make yellow flowers with green leaves!
What a pity! It's a problem with Poser3/4, it's not specific to PlantStudio.
So as a solution, you just need RayDream Studio5.
( You need the 3ds plug-in of RayDream, if you don't have it
It's available on http://www.metacreations.com )
- Create your plant in PlantStudio, and export it in DXF format, with the
option "place each type of plant part in its own layer."
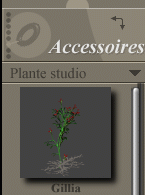
for instance save the plant gillia under "gillia.dxf"
- Open RayDream5 and import your dxf plant inside
for instance import "gillia.dxf" inside
- Save all your RayDream scene with "save as...rds" option and... close RayDream!
for instance save your scene as "gillia.rds"
- Open RayDream5 again! and import the rds scene you've just saved before
for instance import "gillia.rds"
( On the "Animation Window" you must read twice the word "Universe" ! )
- Save ( not export but save! ) all your RayDream scene with "save as...3ds" option
for instance save all the scene as "gillia.3ds"
- You're able to open your 3ds file in Poser3/4 and paint it in Poser.
for instance import "gillia.3ds" in Poser.
back to top
|
How to Make a Wreath in PlantStudio
Cynthia Kurtz
|
 To create a wreath in PlantStudio,
- First, generate a circular plant. To do this, breed any long skinny plant with no branching with breeding variation set to high. Eventually you will get curly plants. When you get a curly plant you like, reduce the breeding variation to medium or low and keep honing in. When you are satisfied, copy your best curly plant to the main window.
- To make the wreath leafy, set the number of compound leaves to 5 or more. Play with these parameters to make the circular plant look filled in:
- Internodes: Curving index for first internode
- Internodes: Curving index for all internodes but first
- Internodes: Length at optimal biomass
- Leaves: Leaf 3D object X [Y,Z] rotation before drawing
- Leaves: Angle between stem and petiole
- Leaves: If compound, bend angle at start [at full size]
- Leaves: Petiole length when leaf has optimal biomass
Also choose a good leaf shape (Leaves: Leaf 3D object) and scale
(Leaves: Leaf 3D object scale at optimal leaf biomass) to make the plant look viney.
- When your first circular plant looks good, copy it to make another
circular plant just like it. Resize the second plant so that it is
slightly smaller than the first plant. Now make small changes to the
parameters mentioned above to make your "second layer" look like it's
woven in with the first layer.
- Do this one or two more times, until you get what looks like a
complex wreath with intertwining leaves.
Each plant should be ever-so-slightly smaller than the ones behind it,
so that the whole thing looks built up. It's a good idea to vary the
leaf shapes to include both rounded leaves and spiny leaves, to give
a better sense of intertwining.
- When you're done, save your wreath as a plant file, then
copy the picture or export the plants to DXF and reassemble the
wreath in your 3D program.
back to top
|
We make no guarantee that any of the mini-tutorials on this page work.
All mini-tutorials on this page are the copyright of their respective authors
and may not be used without that author's permission.
Policies regarding the user mini-tutorials page are subject to change without notice.
|
